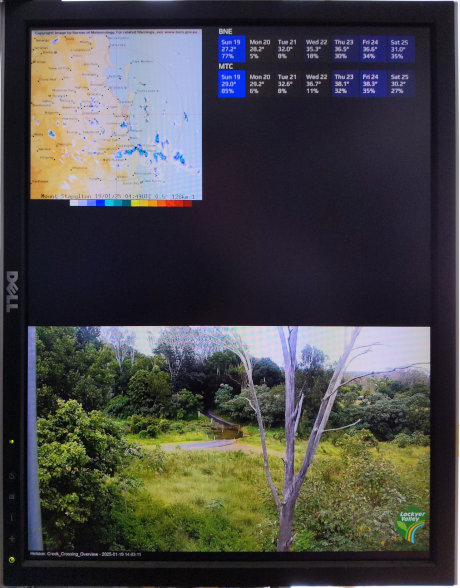
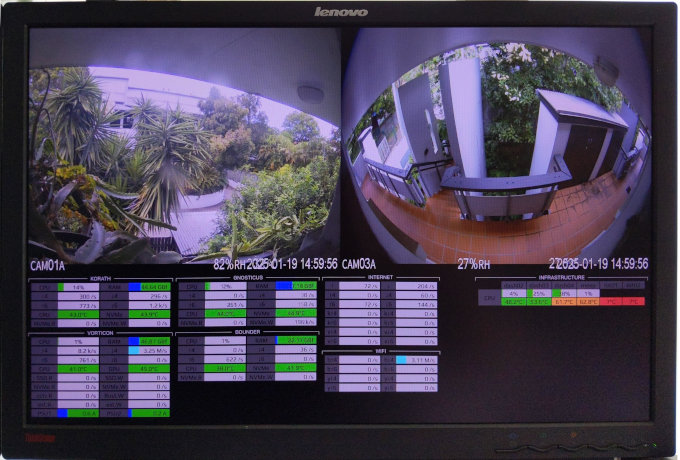
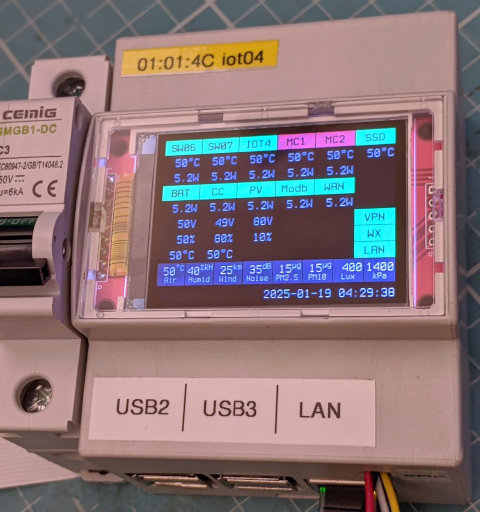
I now have a few old monitors I have hooked up to Raspberry Pi devices, which show custom full-screen web pages and live CCTV feeds. If there is a power outage, the dashboards restore themselves when the power returns just as they were before, without any manual steps required. I thought I would document the process in case anyone else is trying to achieve something similar.


The dashboards work by configuring the Pi to automatically log in as a "kiosk" user, start X11, then run the Chromium browser full-screen in kiosk mode. Kiosk mode limits many browser functions including hiding tabs and the address bar so it is perfect for this use case.
Firefox can also be used, however its kiosk mode is less refined. I found that when my Internet connection dropped out, Firefox would display a bunch of error messages about being unable to verify the security of its addons. Chromium however, continues to display a local HTML file even if there is no Internet connection, so it is more robust for this purpose.
This procedure is using Arch Linux ARM on Raspberry Pi devices, however it should work on any modern distribution that uses systemd, and with any other device capable of running Linux and X11. I am skipping the steps required to install various software packages as this varies considerably between distributions. You will need to work out yourself which packages to install, however X11, and optionally Unclutter, Chromium, Barrier and FFmpeg are all that is required. I am also skipping the X11 config. In my case it worked out of the box, however your device may require additional steps.
This procedure also assumes you have a web page or IP camera you wish to display. Creating your own HTML dashboard or configuring an IP camera is beyond the scope of this article.
The instructions here are suitable for multiple devices booting over the network and sharing a single filesystem. The scripts contain conditional blocks to ensure different devices show different content, even though they are all configured the same. Network booting is not required however, and this process works equally well when booting from local storage.
Make X11 start on boot
-
Create a new user called kiosk. The web browser will run as this user, so it only needs limited access. Create a home directory for this user and assign it the proper permissions.
useradd -g users kiosk
mkdir /home/kiosk
chown kiosk:users /home/kiosk
-
When you su kiosk to become the kiosk user, you will find many commands do not work. This is because some environment variables are set to your login user and not the kiosk user, so they have to be updated. If you are using the Bash shell, you can do this automatically:
# /home/kiosk/.bashrc

export XDG_RUNTIME_DIR=/run/user/$UID
export DBUS_SESSION_BUS_ADDRESS="unix:path=$XDG_RUNTIME_DIR/bus"
export DISPLAY=:0
Now after running su kiosk things like systemctl --user restart chromium.service will work as expected. If you try running systemctl --user status and get an error, run echo $XDG_RUNTIME_DIR to confirm the environment variables really were updated, and the UID is correct for the kiosk user.
-
Make this user log in automatically when the system boots. This can be done by creating a systemd override. You can do this via the CLI, or just create /etc/systemd/system/getty@tty1.service.d/override.conf with this content:
[Service]
ExecStart=
ExecStart=-/usr/bin/agetty --autologin kiosk --noclear %I $TERM

# Start immediately, don't wait for boot to finish
Type=Simple
-
Make X11 start as soon as the kiosk user is logged in. I did this by creating /home/kiosk/.bash_login with the following content:
# Start Xorg, run .xinitrc and exit when .xinitrc finishes.
exec /usr/bin/xinit /usr/bin/sh ~/.xinitrc -- -keeptty -sharevts 2>&1 | tee .local/share/xorg/xinit.log
If you run into problems getting X11 started, you can look at /home/kiosk/.local/share/xorg/xinit.log for error messages. Alternatively, SSH into the device, then as root run xinit -- -keeptty -sharevts to try to start X11. If it fails, you will see the reason in your terminal.
-
When X11 starts it will now run .xinitrc in the kiosk user's home directory, so we can put commands in there to run once X is going.
# Make $DISPLAY available to systemd user units
/etc/X11/xinit/xinitrc.d/50-systemd-user.sh

# If this machine is called "dash02" then rotate the screen by 90 degrees as
# the monitor is in portrait orientation.
if [ "$HOSTNAME" == "dash02" ]; then
        xrandr --output HDMI-1 --rotate left
fi

# Always keep the screen on
xset -dpms
xset s off
xset s noblank

# Make sure the temporary profile folder is available
mkdir /tmp/chromium-kiosk

# Hide the mouse cursor if it hasn't moved for some seconds.
unclutter -timeout 10

# Keep the session open
exec cat

# NOTE: Barrier and other things are launched in /etc/systemd/user/
Omit any part of this that is not relevant to your needs. The reason for the condition that checks for the "dash02" hostname is because I share the same configuration files amongst all dashboard devices, so this allows device-specific configuration without needing to worry about getting the right version of each file onto the correct device. I can just deploy the same files to all devices to keep it simple (in my case many of them boot over the network from the same shared filesystem).
Start graphical apps with X11
-
Create a systemd user service for Chromium. This allows systemd to handle automatic restarts if the process crashes.
# /etc/systemd/user/chromium.service
[Unit]
Description=Run Chromium in Kiosk mode

[Service]
ExecStart=/etc/systemd/user/chromium.sh %l

Restart=always
RestartSec=2

# Make it very likely to be killed in low memory situations.  This is
# because a memory leak in a web page is going to be the most likely
# reason for running out of memory, so terminating the browser first
# (where systemd will immediately restart it) is probably the most
# likely way to recover from that situation.
OOMScoreAdjust=800

[Install]
WantedBy=default.target
# /etc/systemd/user/chromium.sh
#!/bin/sh

HOSTNAME="$1"

# Make sure X is running
xrdb -query dummy || exit 1

URL="file:///srv/web/index.html?hostname=$HOSTNAME"
case "$HOSTNAME" in
  dash01)
    POS="1920,750"
    SIZE="1920,450"
  ;;
  dash02)
    POS="0,0"
    SIZE="1200,1600"
  ;;
  dash03)
    # Don't run at all
    exec cat
  ;;
  iot04)
    POS="0,0"
    SIZE="320,240"
  ;;
  *)
    echo "Host '$HOSTNAME' not implemented."
    exit 1
  ;;
esac

exec /usr/bin/chromium \
  --no-sandbox \
  --window-position="$POS" \
  --window-size="$SIZE" \
  --ignore-gpu-blocklist \
  --enable-gpu-rasterisation \
  --enable-accelerated-video-decode \
  --no-v8-unntrusted-code-mitigations \
  --no-pings \
  --no-recovery-component \
  --no-first-run \
  --noerrdialogs \
  --start-fullscreen \
  --start-maximized \
  --disable-notifications \
  --disable-infobars \
  --disable-translate \
  --disable-features=Translate \
  --kiosk \
  --incognito \
  "$URL"
Adjust chromium.sh as needed for your desired screen size and position. In this example dash01 is on the lower half of the second screen of a dual-monitor dashboard (to make room for a live CCTV image on the upper half of the display), dash02 is on a 1600x1200 monitor in portrait mode (so 1200x1600), and dash03 does not run Chromium at all, but since all these files are identical amongst all devices we need to pretend the script started successfully, otherwise systemd will keep trying to restart it over and over burning CPU cycles.
Note the URL I am loading on all dashboards is the local file /srv/web/index.html. Change this to suit your needs. In my case that file contains Javascript that examines the ?hostname= parameter and creates DOM elements on the page depending on the host. You may wish to do things differently, such as setting URL= inside the case block, to display a different URL depending on the hostname.
-
I use Barrier for the dashboards near me, so I can move my mouse over to them to click buttons on them:
# /etc/systemd/user/barrierc.service
[Unit]
Description=Run Barrier keyboard/mouse sharing client

[Service]
ExecStart=barrierc --no-daemon --disable-crypto --name %H barrier-server.example.com
Restart=always
RestartSec=2

[Install]
WantedBy=default.target
-
These new systemd user services need to be activated. You can do this as the kiosk user with systemctl --user enable chromium.service and the same for Barrier if you wish. If you don't want to use Barrier, omit the activation here and it will not run, even if the above barrierc.service file is present.
Display live video from IP cameras
-
I use ffmpeg to display a live multicast video feed from IP cameras (skip this step if you don't wish to do this). This feed can be sent from the camera on another Pi, or from a Dahua IP camera. Other IP cameras (e.g. Hikvision) do not properly implement multicast so you will need to work out how to receive a video stream yourself, by modifying the ffmpeg command in the script below.
# /etc/systemd/user/picam-view.sh #!/bin/sh CAM="$1" VF="" PARAMS="" ACCEL=none # Use -v to show ffmpeg messages and commands if [ "$2" == "-v" ]; then VERBOSE="-v" set -x else PARAMS="$PARAMS -loglevel repeat+level+fatal" fi if [ -e /dev/video12 ]; then # Use Raspberry Pi hardware-accelerated decoder ACCEL=pi echo "Using Pi acceleration" elif [ -e /dev/video19 ]; then # Raspberry Pi 5 - no acceleration ACCEL=none echo "Using Pi acceleration" elif [ -e /dev/dri/renderD128 ]; then # Use Intel hardware-accelerated decoder ACCEL=vaapi echo "Using VAAPI acceleration" fi # Set window location case "$HOSTNAME" in # Specific settings for each dashboard. dash01) case "$CAM" in # Camera-specific settings for this dashboard. # This one is full screen (a 1920x1200 window starting at 0,0) # but the source image is cropped with FFmpeg's "crop" filter. cam02a-hd) VW=1920; VH=1200; X=0; Y=0; WIDTH=$[1920-$X]; HEIGHT=$[$VH*$WIDTH/$VW]; VF="crop=1583:$[1080-90]:0:90," ;; # These ones are just scaled and positioned side by side, as # shown in the landscape example at the top of this post. cam01a*) VW=1280; VH=996; X=1920; Y=0; WIDTH=960; HEIGHT=$[$VH*$WIDTH/$VW] ;; cam03a*) VW=1280; VH=996; X=$[1920+960]; Y=0; WIDTH=960; HEIGHT=$[$VH*$WIDTH/$VW] ;; esac ;; dash0[34]) # More examples for the dash03 and dash04 devices. case "$CAM" in cam02a-hd) VW=1920; VH=1200; X=0; Y=0; WIDTH=$[1920-$X]; HEIGHT=$[$VH*$WIDTH/$VW]; VF="crop=1583:$[1080-90]:0:90," ;; cam02a-4k) VW=1920; VH=1200; X=0; Y=0; WIDTH=$[1920-$X]; HEIGHT=$[$VH*$WIDTH/$VW]; ;; cam01a*) VW=1280; VH=996; X=0; Y=0; WIDTH=960; HEIGHT=$[$VH*$WIDTH/$VW] ;; cam03a*) VW=1280; VH=996; X=960; Y=0; WIDTH=960; HEIGHT=$[$VH*$WIDTH/$VW] ;; esac ;; esac # Add hardware acceleration parameters based on detection above. case "$ACCEL" in vaapi) PARAMS="$PARAMS -hwaccel vaapi -hwaccel_output_format vaapi" ;; pi) PARAMS="$PARAMS -codec:v h264_v4l2m2m" ;; esac # Add video source # Example 1: Use sed to convert "cam12" into IPv6 "[ff08:1500::ca12]" #IP=`echo "[ff08:1500::$1]" | sed "s/cam/ca/"` # Example 2: User sed to convert "cam04" into IPv4 "239.0.0.4" #IP=`echo "239.0.0.$1" | sed "s/cam0*//"` # Example 3: Use the camera name with a fixed domain, with the IP loaded from /etc/hosts or via DNS. MC_SOURCE="$CAM.mc.camera.example.com" # Regardless of what we picked above, use UDP streaming on port 5004. Change this if you're not using multicast streaming on port 5004. PARAMS="$PARAMS -fflags +nobuffer -i udp://$MC_SOURCE:5004" # Hardware scaling if available. if [ $ACCEL == vaapi ]; then VF="${VF}scale_vaapi=w=$WIDTH:h=$HEIGHT,hwdownload,format=yuv420p," fi # Try to display frames as quickly as possible to avoid lag. VF="${VF}setpts=N/30/TB" PARAMS="$PARAMS -aspect $WIDTH:$HEIGHT -vf $VF -f xv -window_x $X -window_y $Y -window_size ${WIDTH}x${HEIGHT} $CAM" # Run ffmpeg to display the video feed. echo /usr/bin/ffmpeg $PARAMS /usr/bin/ffmpeg $PARAMS -
This script needs to be launched with another systemd user service. This is because ffmpeg can easily crash due to corrupted video or running out of memory, so having systemd restart it when that happens ensures that the video feed is never lost for too long.
# /etc/systemd/user/picam-view@.service
[Unit]
Description=Live feed from IP camera

[Service]
# Make sure X is running
ExecStartPre=xrdb -query dummy

# Remember to escape dashes: systemctl --user start picam-view@cam02a\\x2dhd
ExecStart=/etc/systemd/user/picam-view.sh %I
Restart=always
RestartSec=2

# Kill and restart if using too much memory
#MemoryMax=96M  # too small for cam02a-4k
MemoryMax=256M

[Install]
WantedBy=default.target
-
Enable this service (as the kiosk user, see below) with systemctl --user enable picam-view\@cam01, assuming your camera is called cam01. If X11 is running, you can test your options (like screen positioning, cropping, etc.) with systemctl --user restart picam-view\@cam01. You can keep modifying the script and restarting until you're happy with the outcome.
No comments:
Post a Comment
Please keep comments relevant to the article. If you need help, please visit a forum like http://www.classicdosgames.com/forum/ or Reddit instead of asking for help here.